
快速連結
列印 – 新增數據
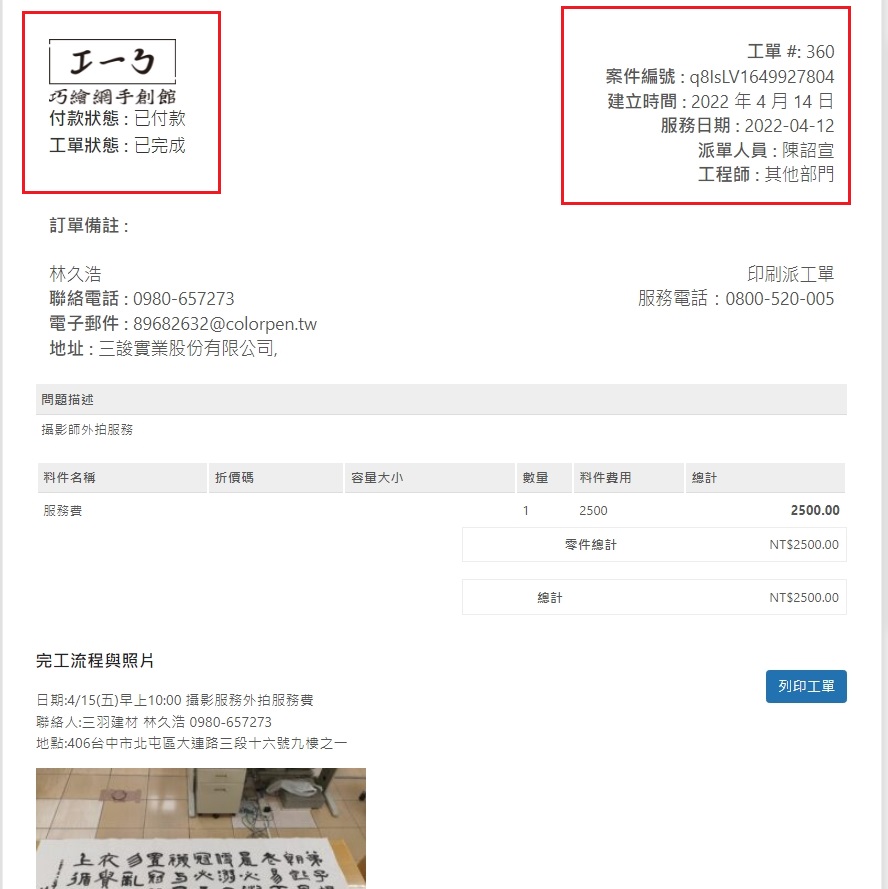
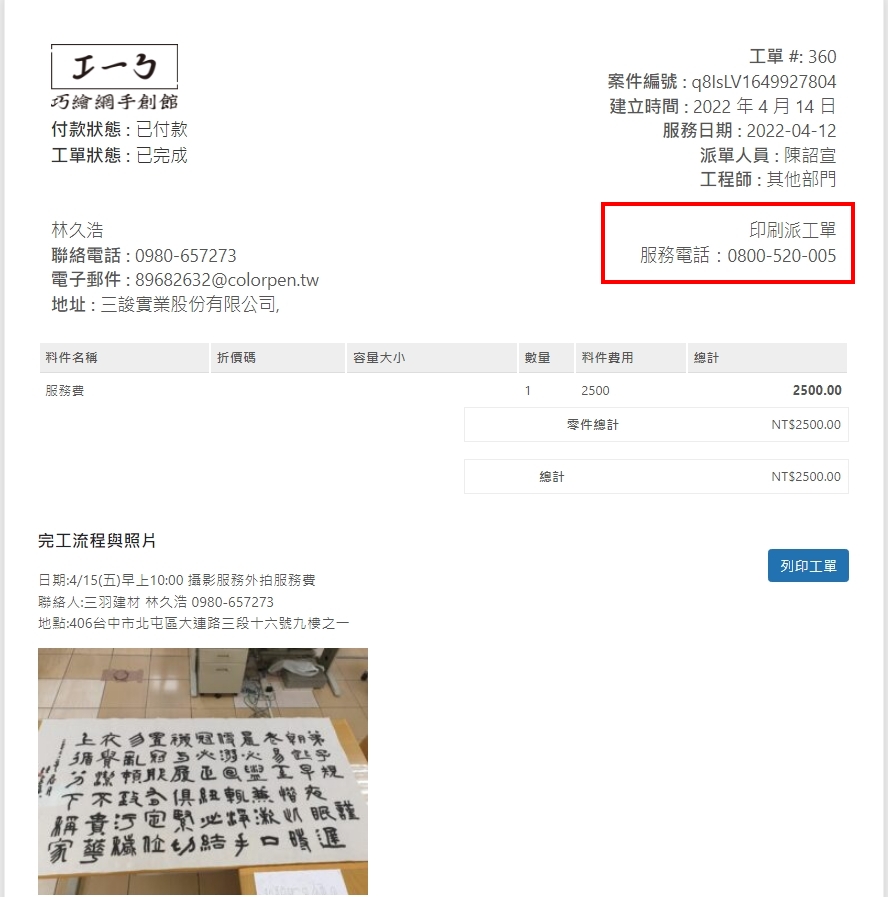
派工單列印 加上服務時間
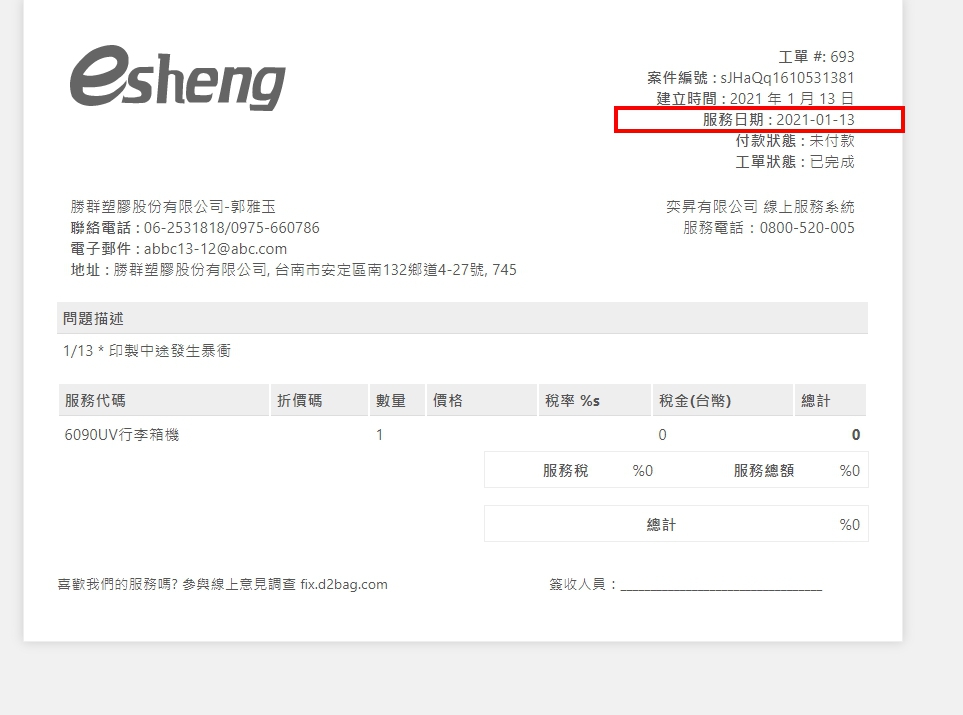
檔案位置: \wp-content\plugins\computer-repair-shop\lib\includes\reports\large_invoice.php
大概49行的<td class=”invoice_headers”>
裡面加上一行
<strong>'.esc_html__("Delivery Date", "computer-repair-shop").' :</strong> '.get_post_meta($order_id, "_delivery_date", true).'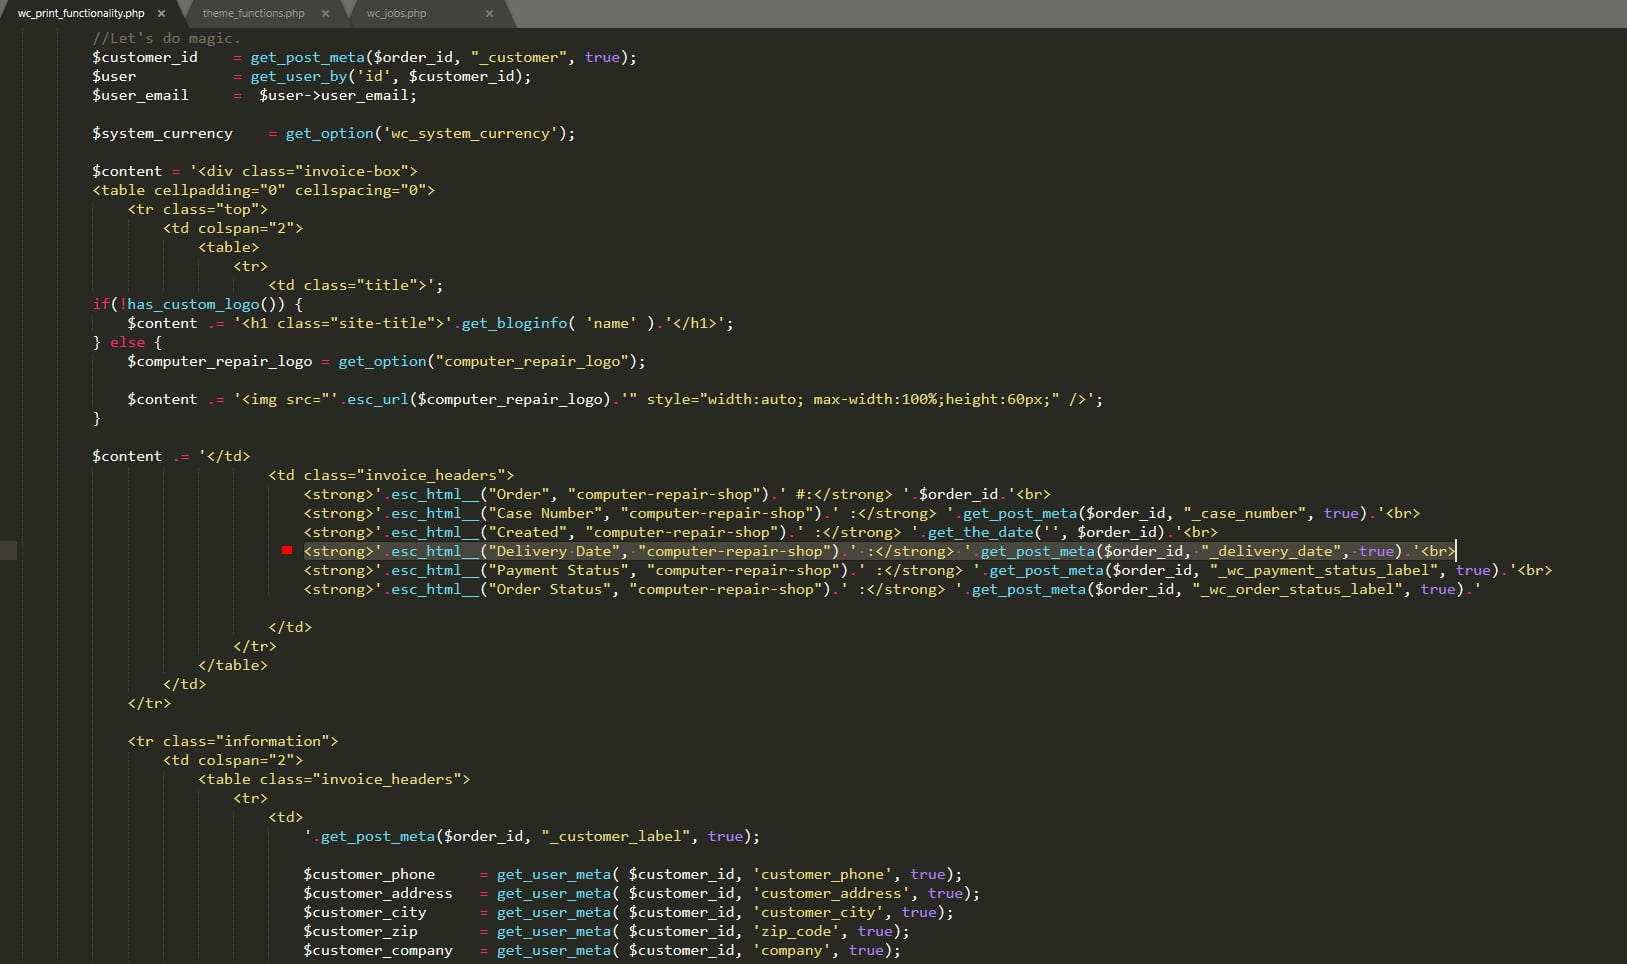
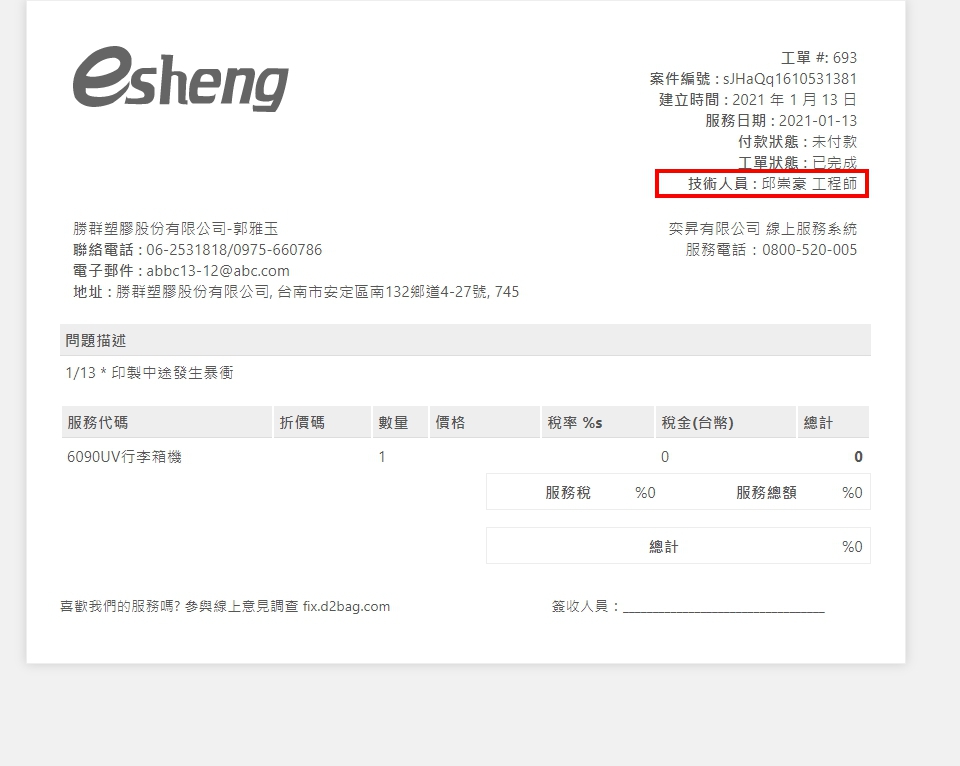
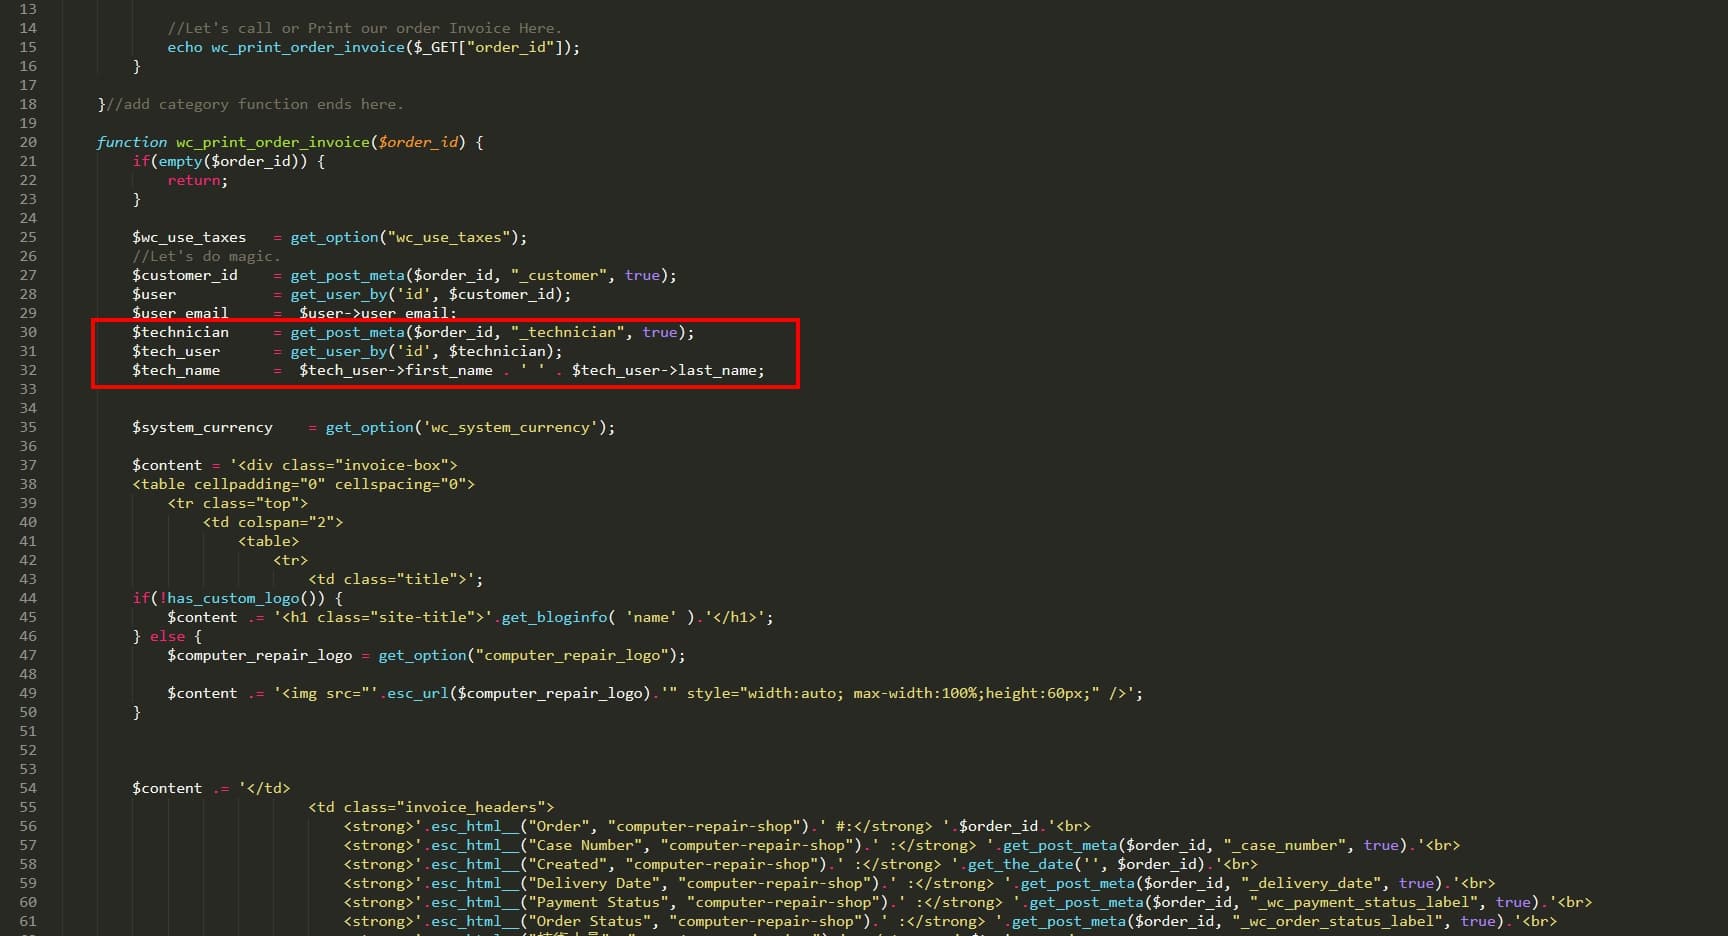
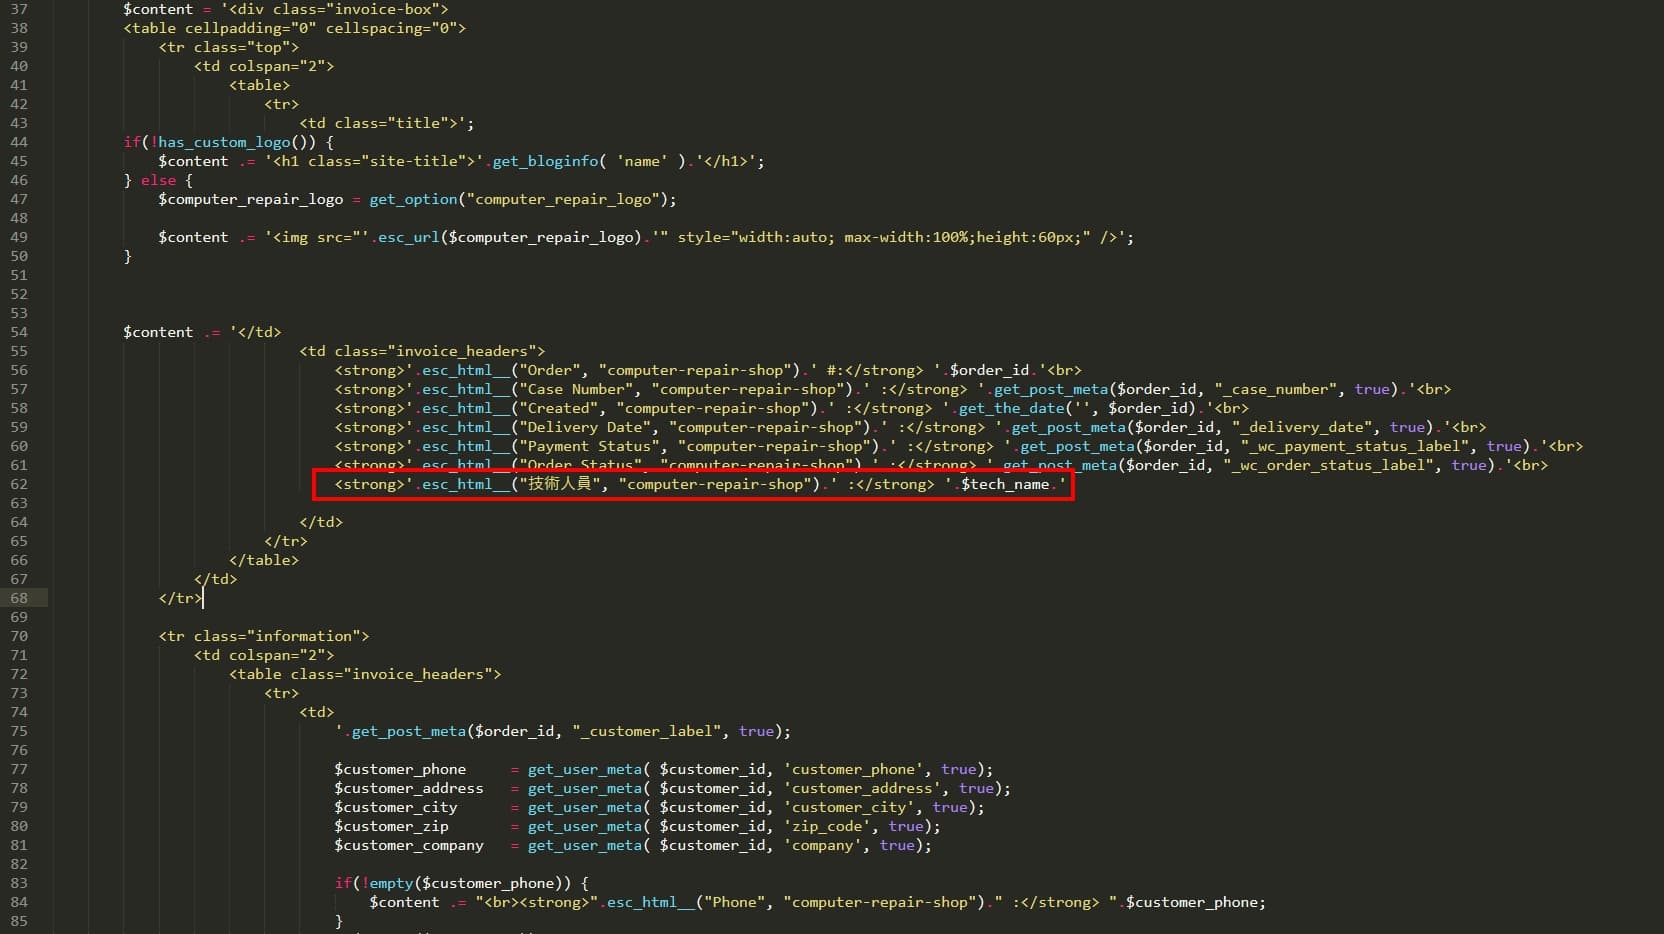
派工單列印 加上技術人員
檔案位置: \wp-content\plugins\computer-repair-shop\lib\includes\reports\large_invoice.php
並插入以下幾個代碼
第一步
$technician 	= get_post_meta($order_id, "_technician", true);
$tech_user 		= get_user_by('id', $technician);
$tech_name 		=  $tech_user->first_name . ' ' . $tech_user->last_name;
第二步
<strong>'.esc_html__("Technicians", "computer-repair-shop").' :</strong> '.$tech_name.'第一步 在前面加入那幾串程式碼是因為要抓取工程師的姓名
如果沒有建立的話只能一直抓到工程師的編號
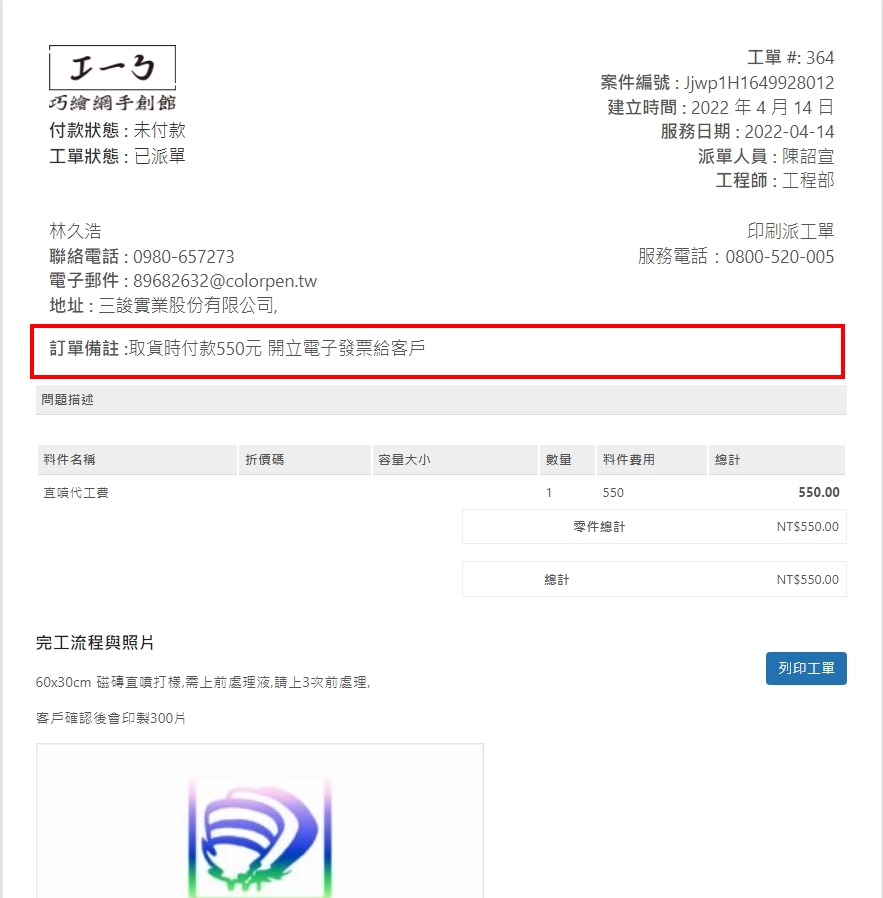
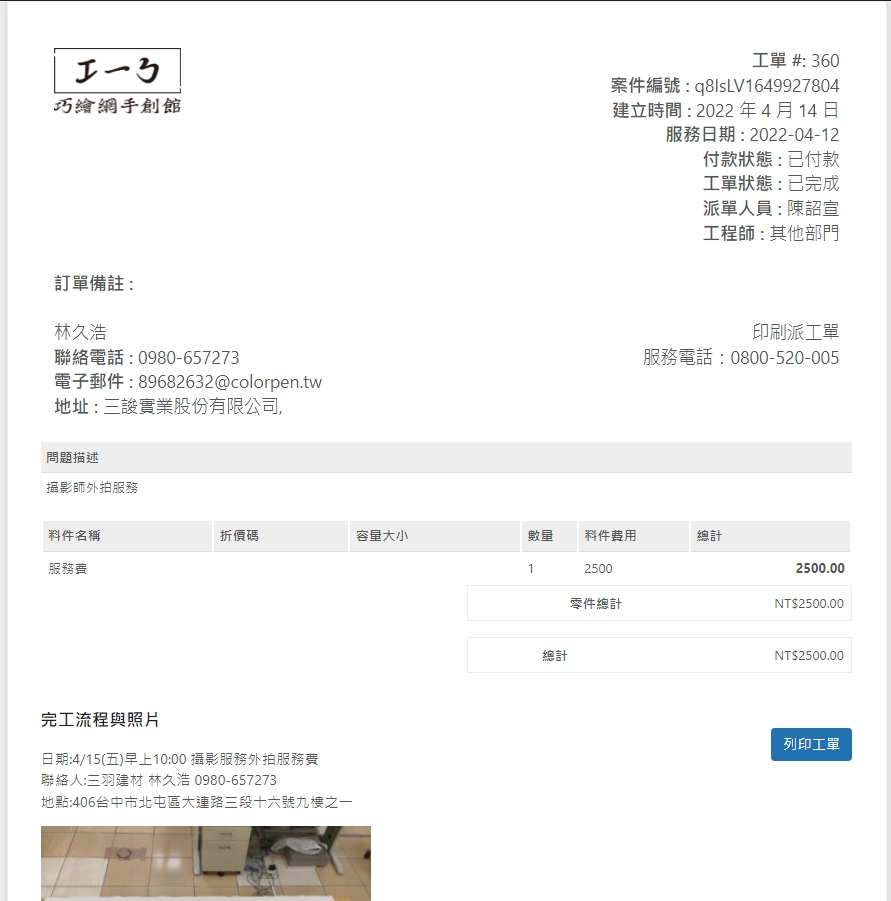
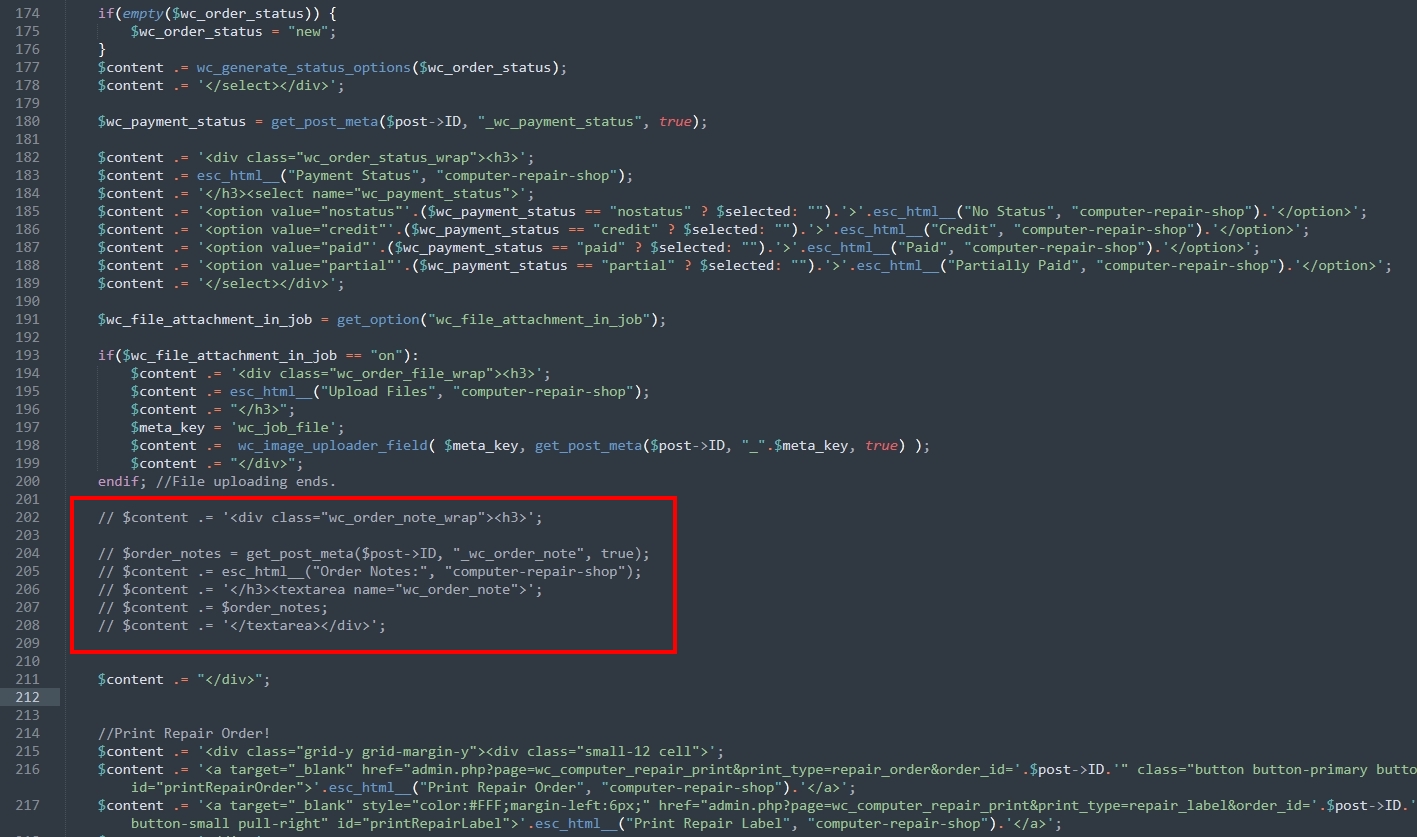
派工單列印 加上訂單備註
檔案位置: \wp-content\plugins\computer-repair-shop\lib\includes\reports\large_invoice.php
並插入以下代碼
<tr>
	<td style="padding-top:0px;">
		<strong>'.esc_html__("訂單備註", "computer-repair-shop").' :</strong>'.get_post_meta($order_id, "_wc_order_note", true).'
	</td>
</tr>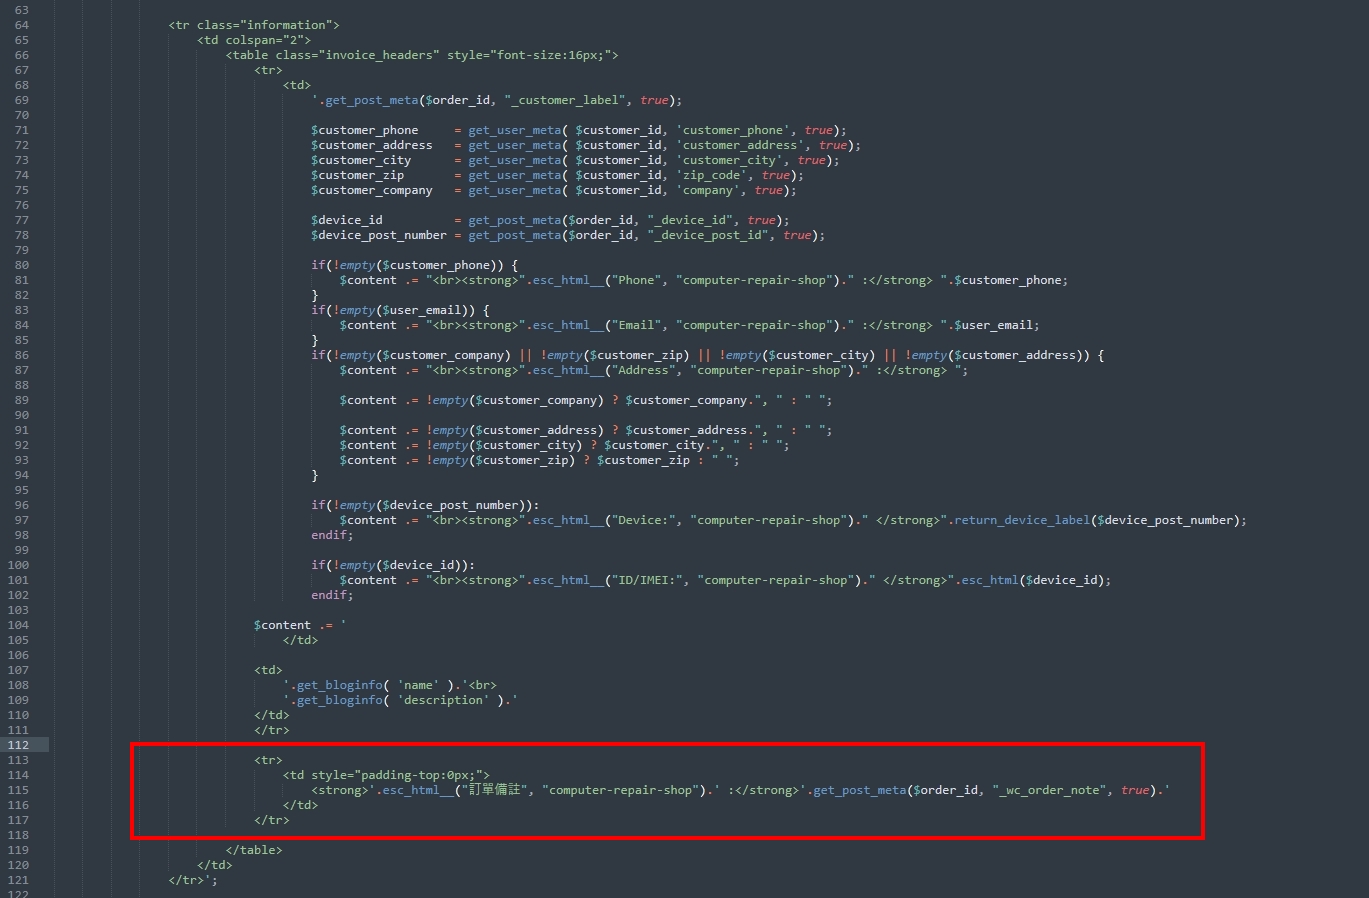
派工單列印 調整資訊欄位位置(左右平衡)
首先,可以對比一下兩者的差異
接下來再對比代碼之間的差異
位置一樣在 \wp-content\plugins\computer-repair-shop\lib\includes\reports\large_invoice.php
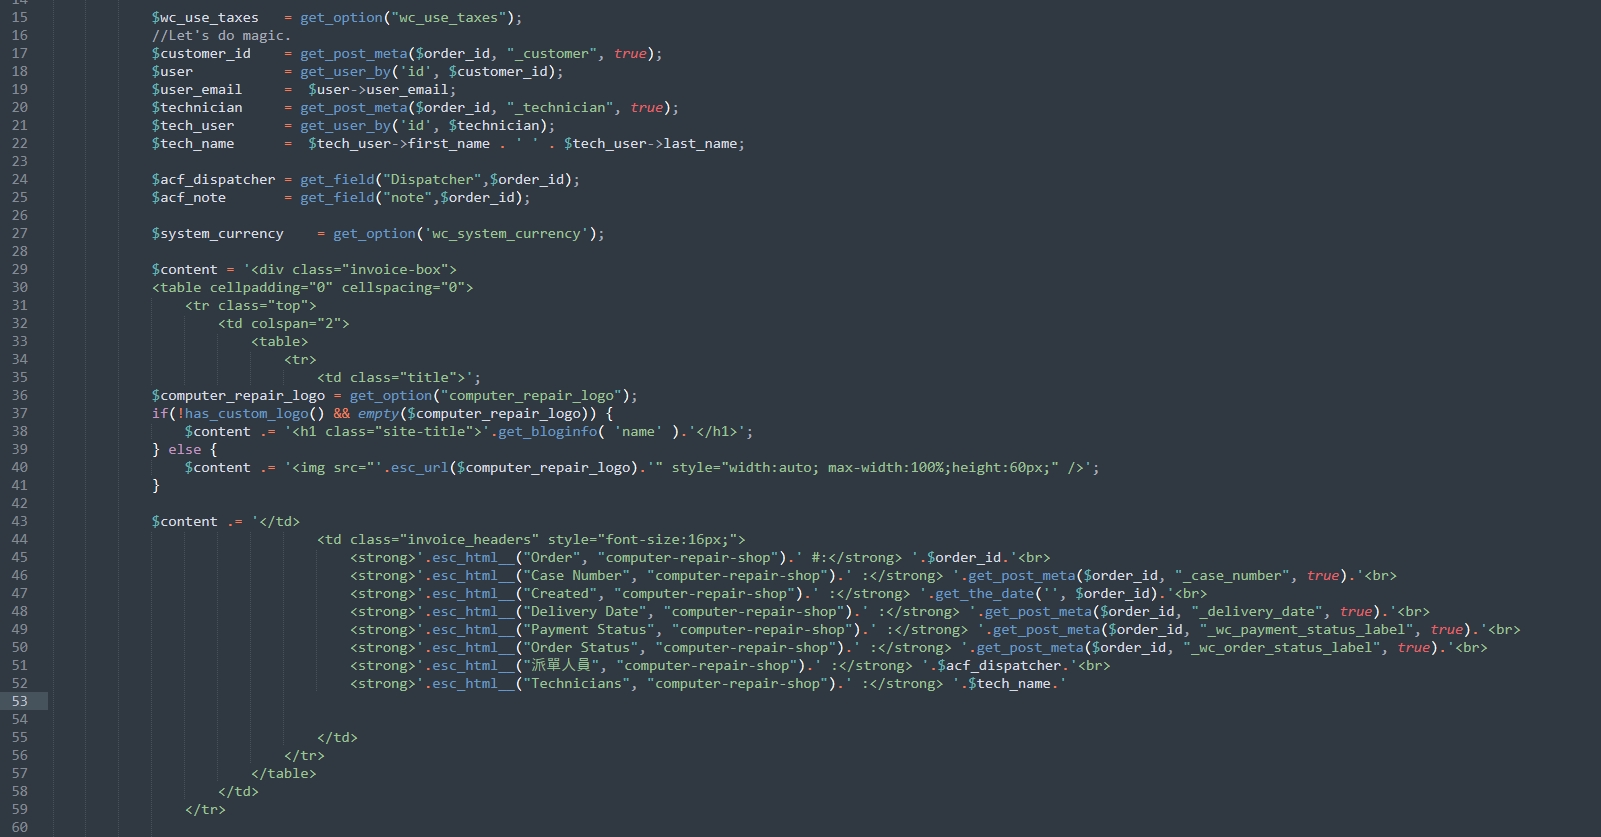
首先在35行的 <td class=”title”>’; 內添加style
margin:0 0 10px 0; 是我後來補的,讓LOGO與聞字有點間距
style="font-size:16px; line-height:1.5em; margin:0 0 5px 0;"接下來在$content .= ‘</td>上方放入要顯示的資訊,這邊是放【付款狀態】與【工單狀態】
$content .=  "<br><strong>".esc_html__("Payment Status", "computer-repair-shop")." :</strong> ".get_post_meta($order_id, "_wc_payment_status_label", true);
$content .=  "<br><strong>".esc_html__("Order Status", "computer-repair-shop")." :</strong> ".get_post_meta($order_id, "_wc_order_status_label", true);
之後再刪除 <td class=”invoice_headers” style=”font-size:16px;”> 裡面與上方重複的資訊即可完成
這樣將資訊分成左右兩邊,列印出來也會比較平衡
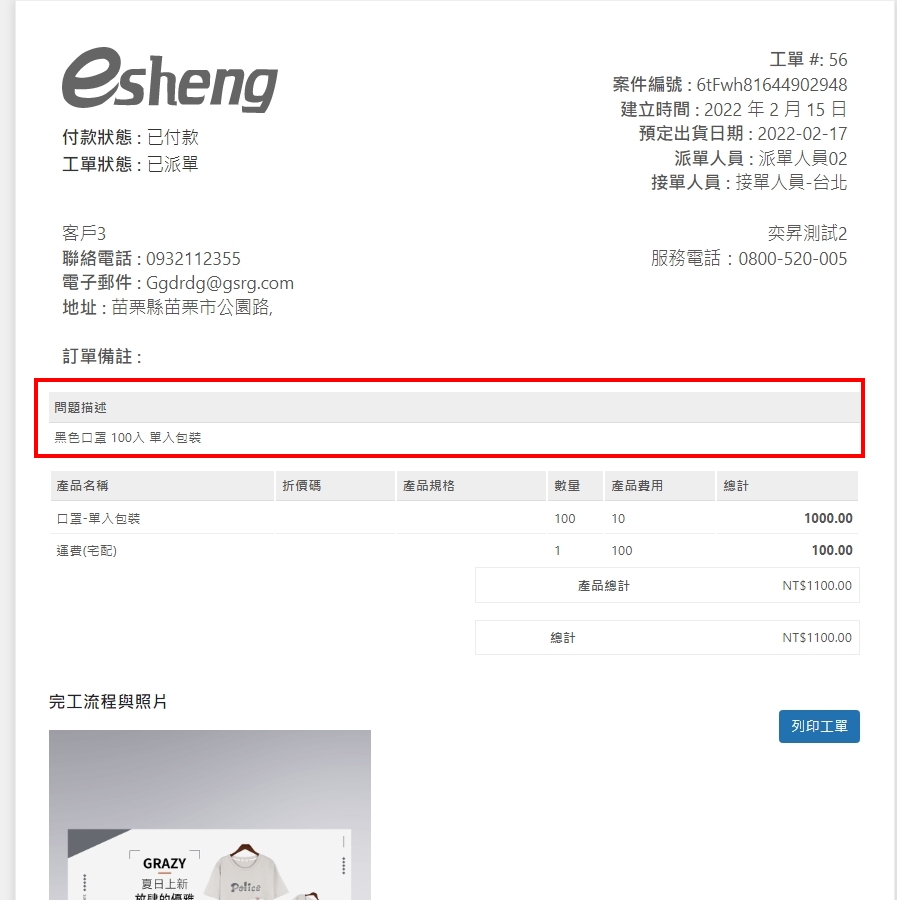
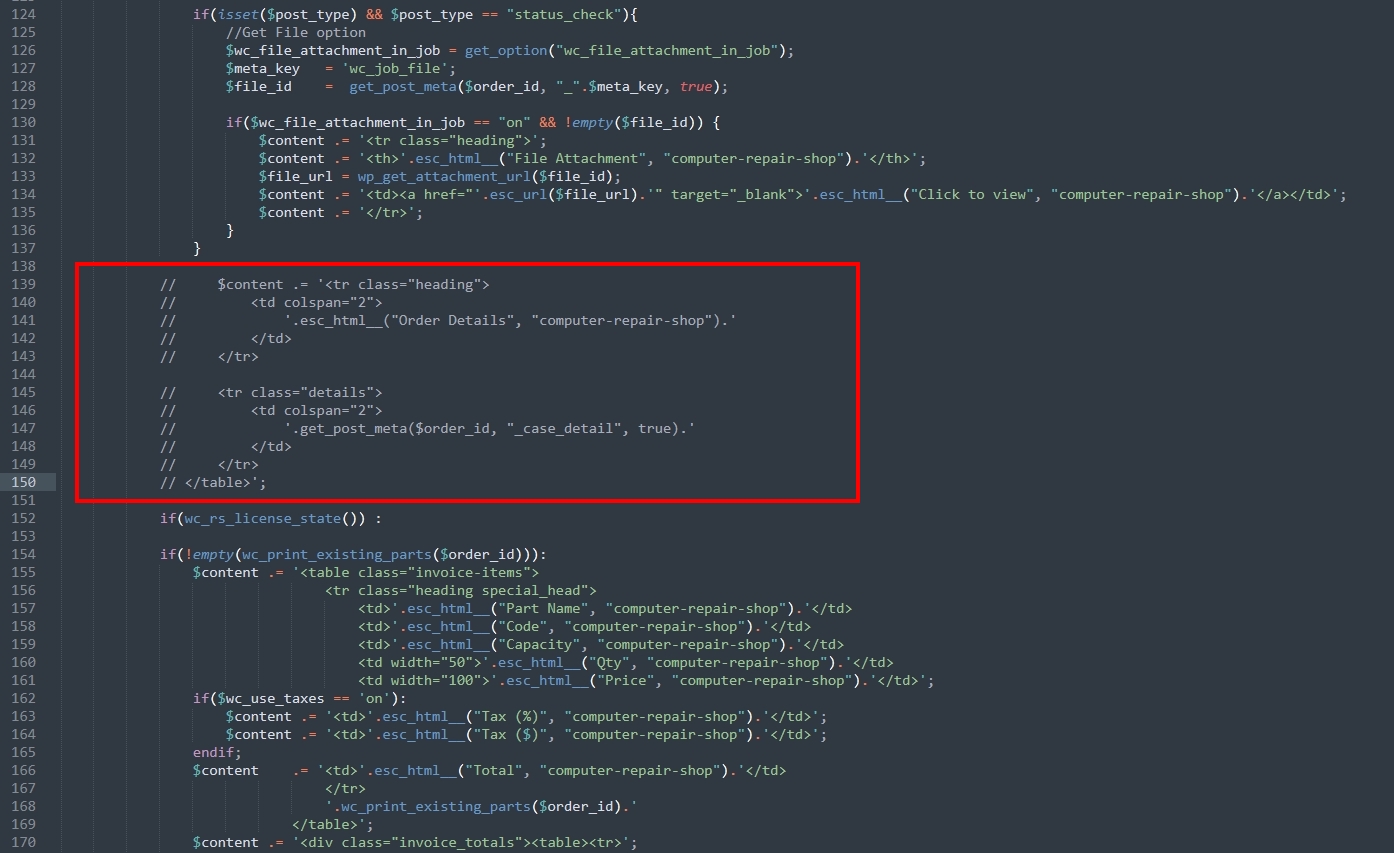
派工單列印 隱藏問題描述
檔案位置: \wp-content\plugins\computer-repair-shop\lib\includes\reports\large_invoice.php
約在139~150行,註解掉即可

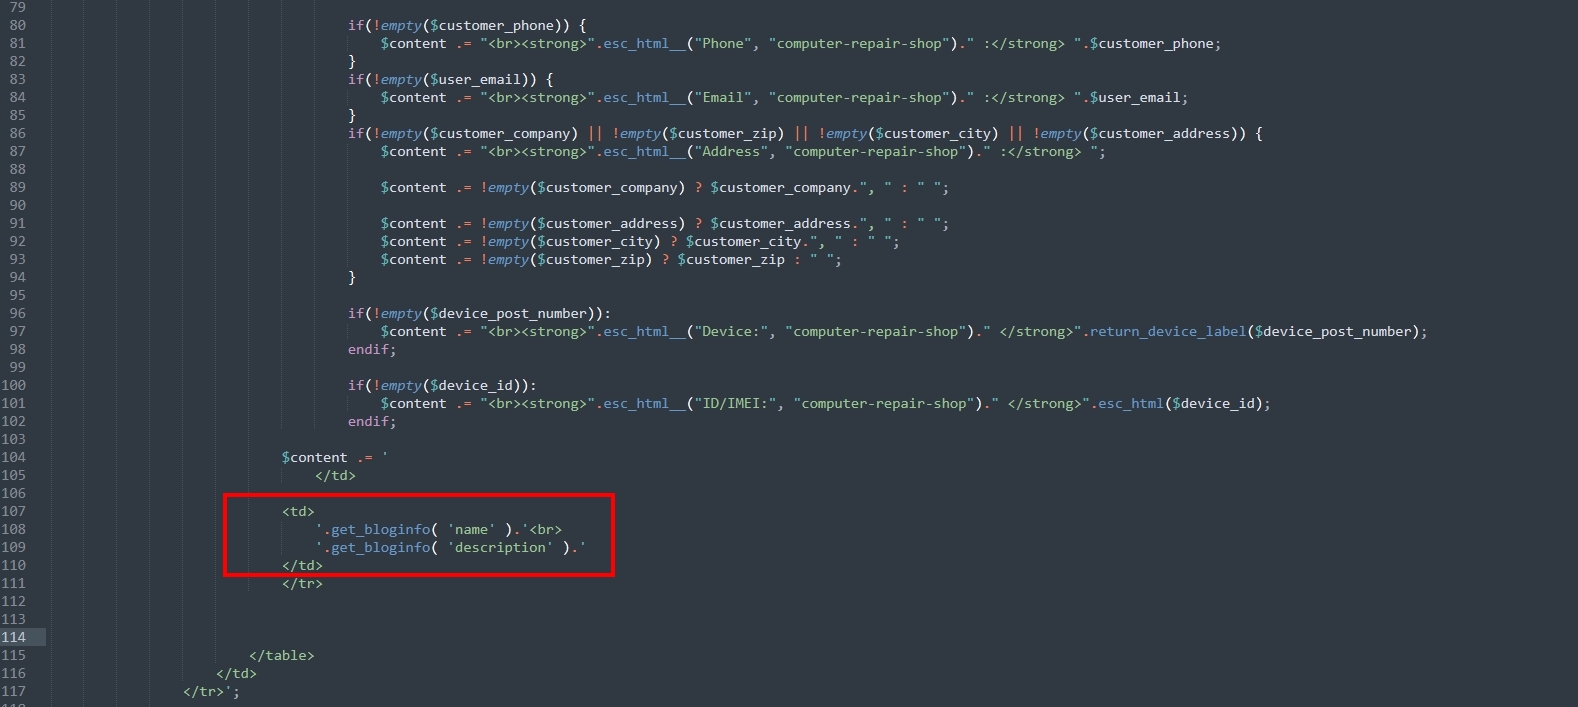
派工單列印 隱藏網站標題與描述
檔案位置: \wp-content\plugins\computer-repair-shop\lib\includes\reports\large_invoice.php
約在108-~109行
有兩個get_bloginfo,應該很好認
刪除掉即可

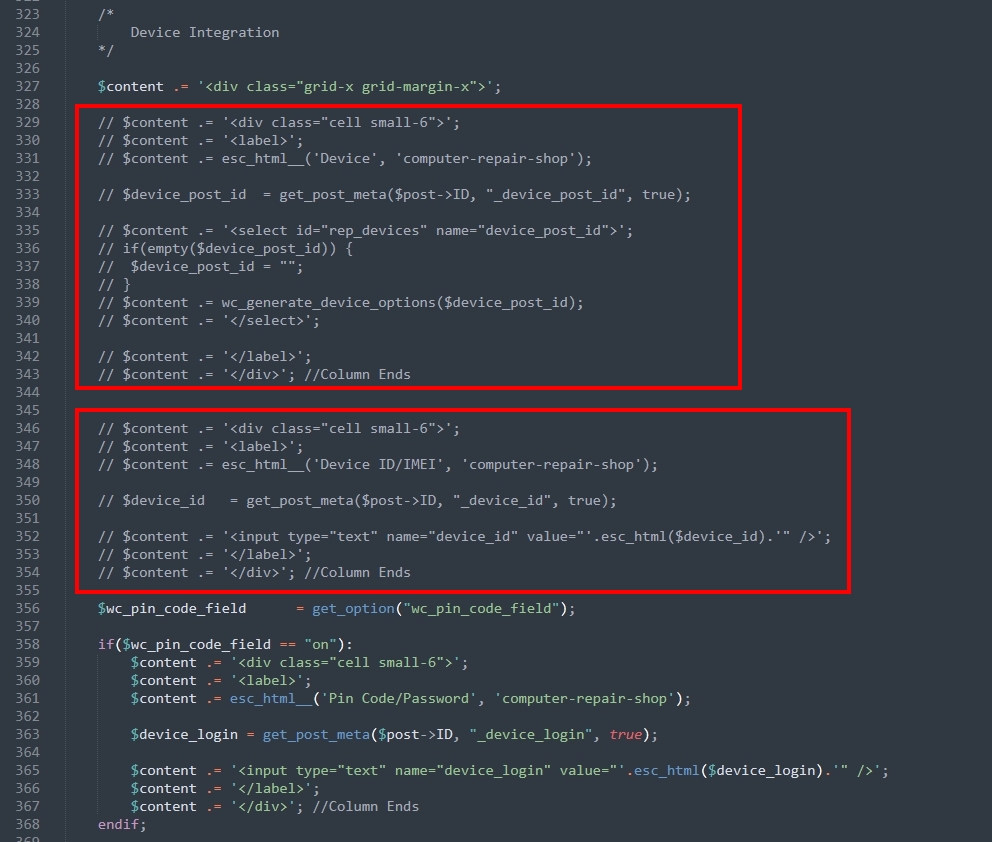
後台 – 編輯派工單
隱藏 設備欄位
找到外掛資料夾\lib\includes\wc_job.php
【設備】約在329~343行
找到以下這段代碼,註解掉即可
$content .= '<div class="cell small-6">';
$content .= '<label>';
$content .= esc_html__('Device', 'computer-repair-shop');

$device_post_id 	= get_post_meta($post->ID, "_device_post_id", true);

$content .= '<select id="rep_devices" name="device_post_id">';
if(empty($device_post_id)) {
	$device_post_id = "";
}
$content .= wc_generate_device_options($device_post_id);
$content .= '</select>';

$content .= '</label>';
$content .= '</div>'; //Column Ends
【設備ID/IMEI】約在346~354行
找到以下這段代碼,註解掉即可
$content .= '<div class="cell small-6">';
$content .= '<label>';
$content .= esc_html__('Device ID/IMEI', 'computer-repair-shop');

$device_id 	= get_post_meta($post->ID, "_device_id", true);

$content .= '<input type="text" name="device_id" value="'.esc_html($device_id).'" />';
$content .= '</label>';
$content .= '</div>'; //Column Ends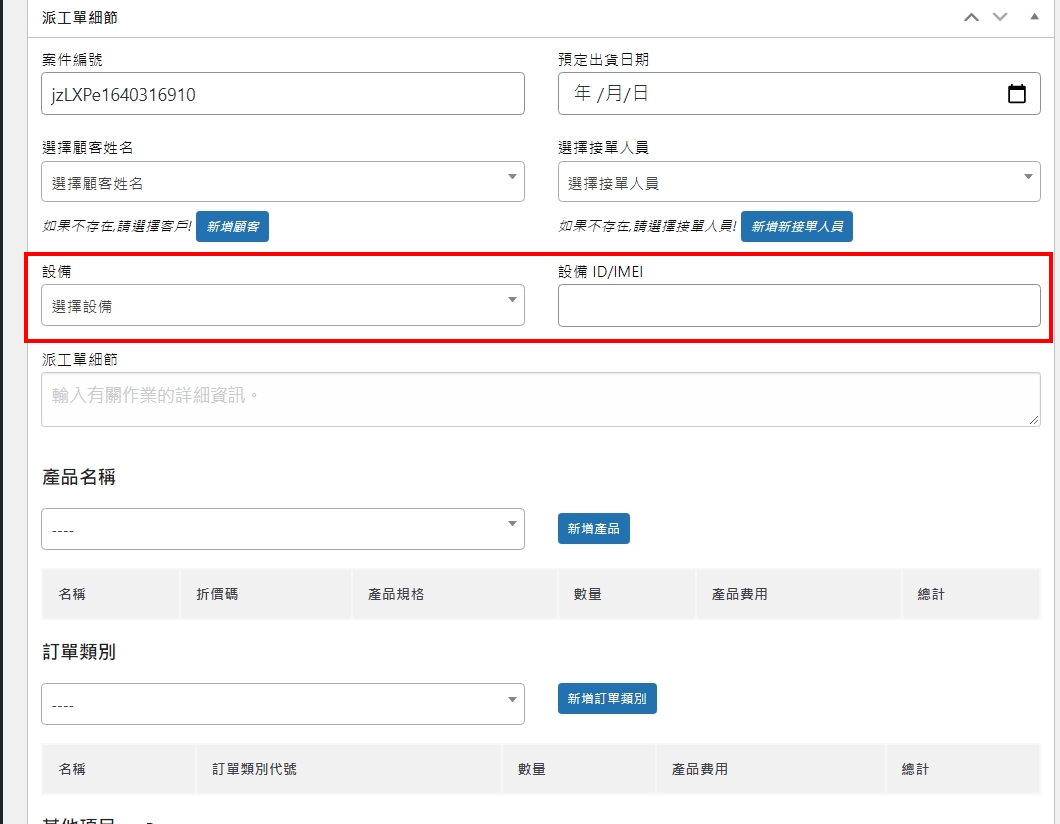
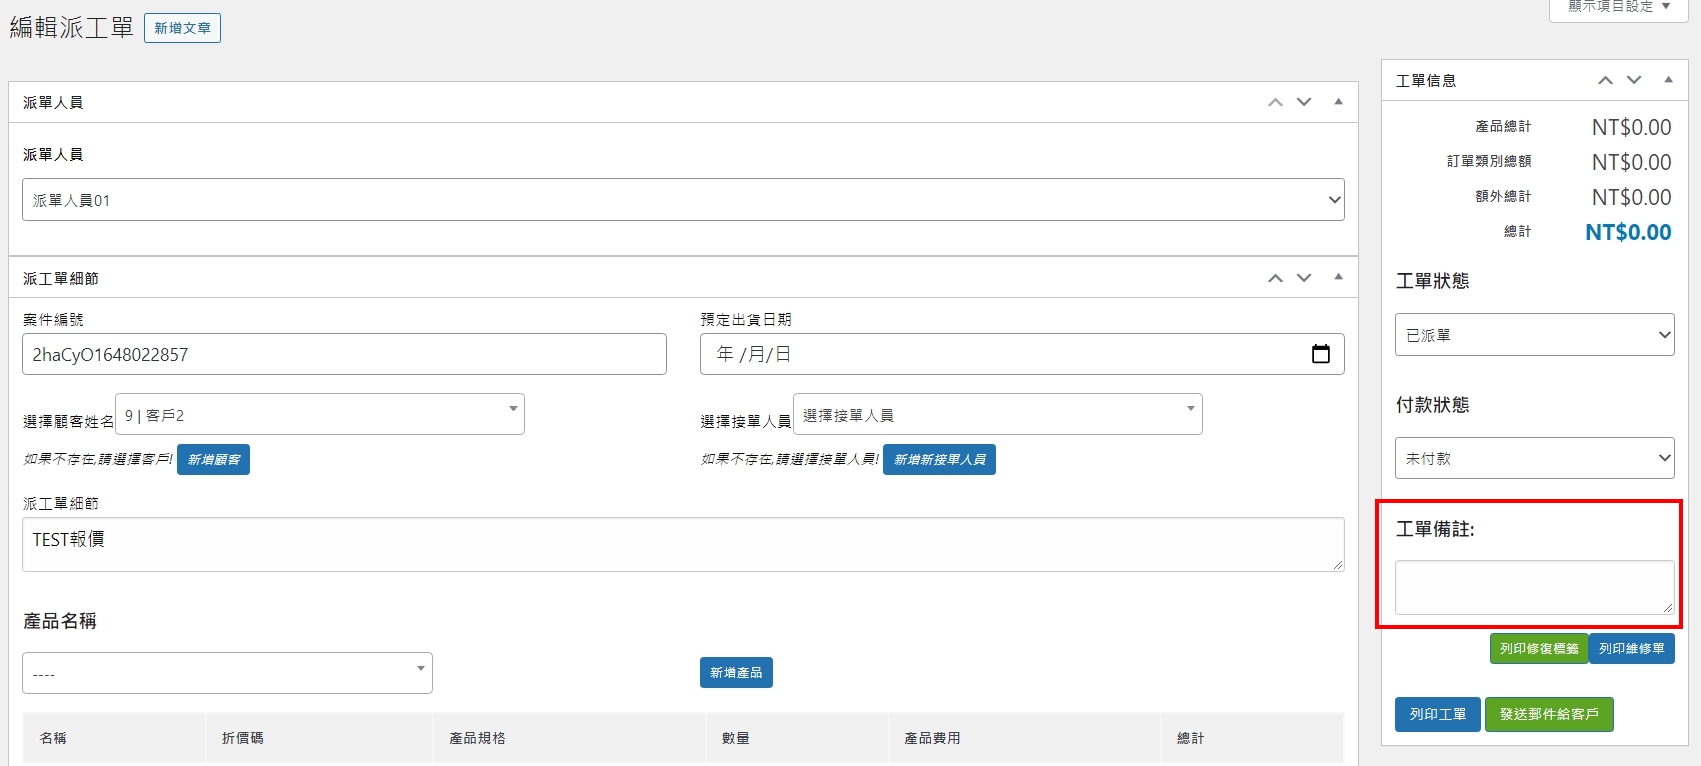
隱藏 工單備註
找到外掛資料夾\lib\includes\wc_job.php
約在202~208行,註解掉即可
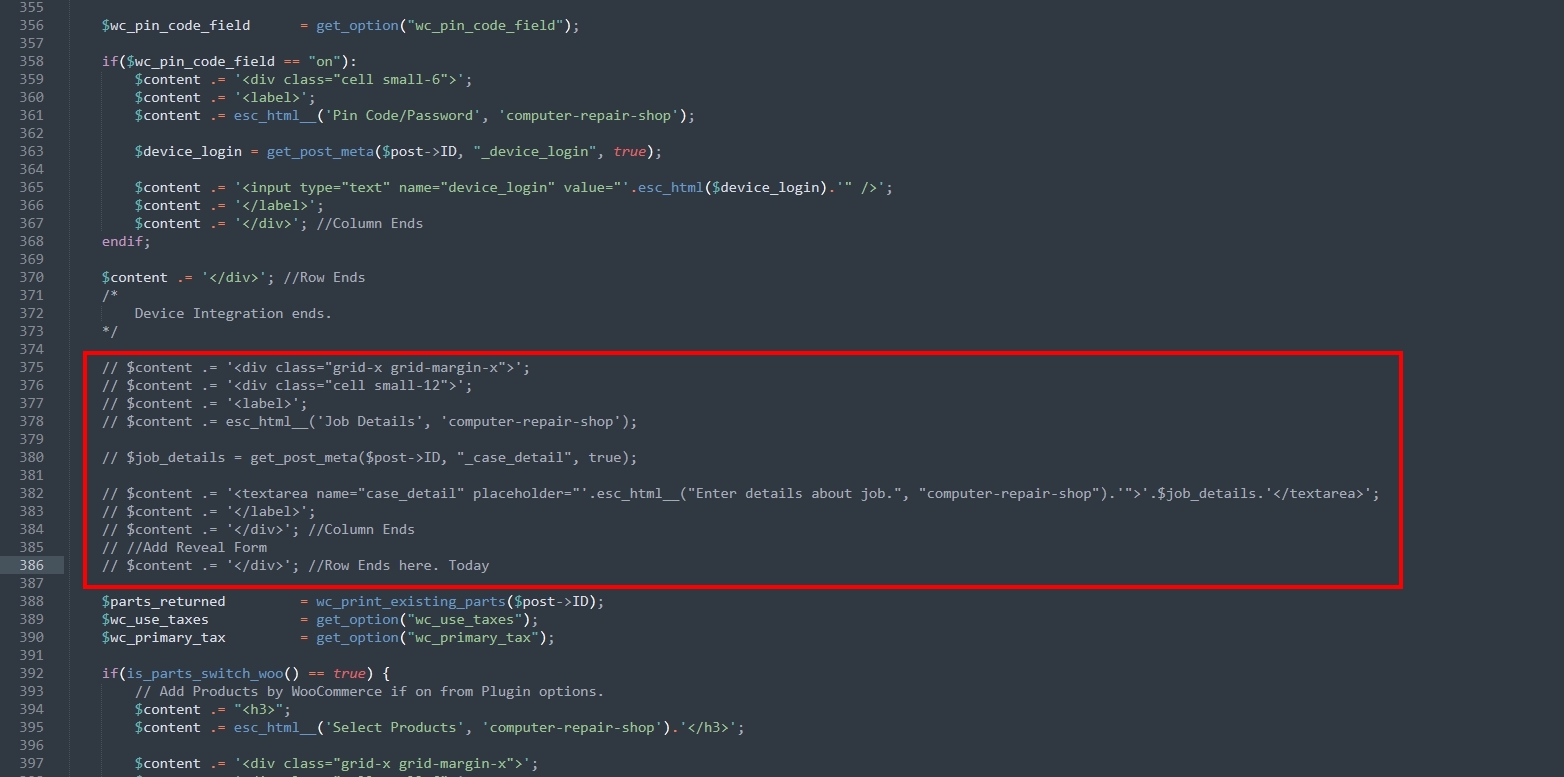
隱藏 派工單細節
找到外掛資料夾\lib\includes\wc_job.php
約在375~386行,註解掉即可
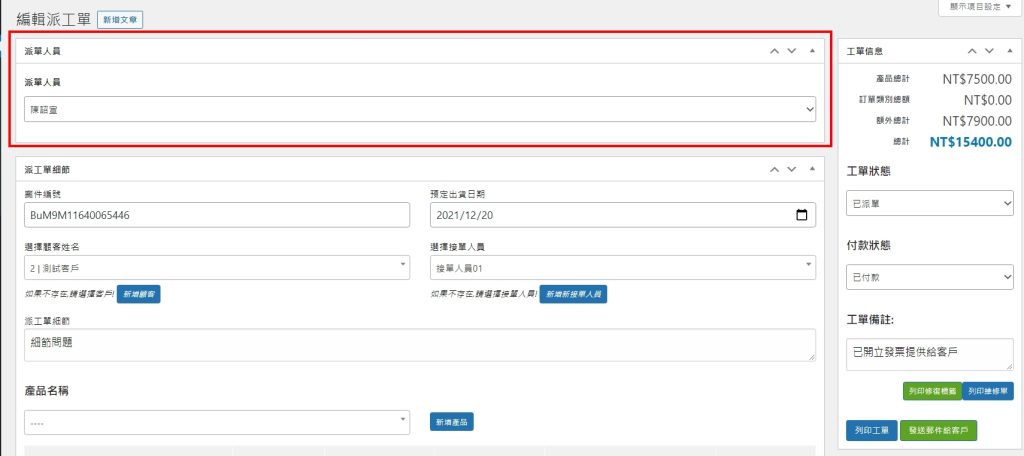
新增ACF自訂欄位 (派單人員) 後台+列印
order.colorpen.tw 製作派工單時,希望能夠有派單人員的資料
於是使用 ACF (Advanced Custom Fields) 自訂派單人員欄位
抓取ACF的數值可參考此頁面
get_field($selector, [$post_id], [$format_value]);
get_field(欄位ID, [文章ID], [是否應用格式化邏輯]);
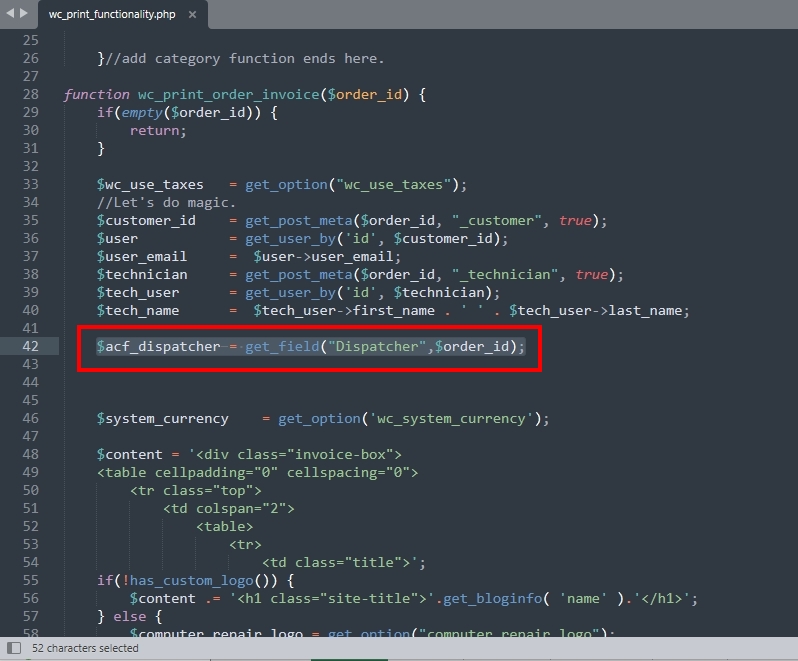
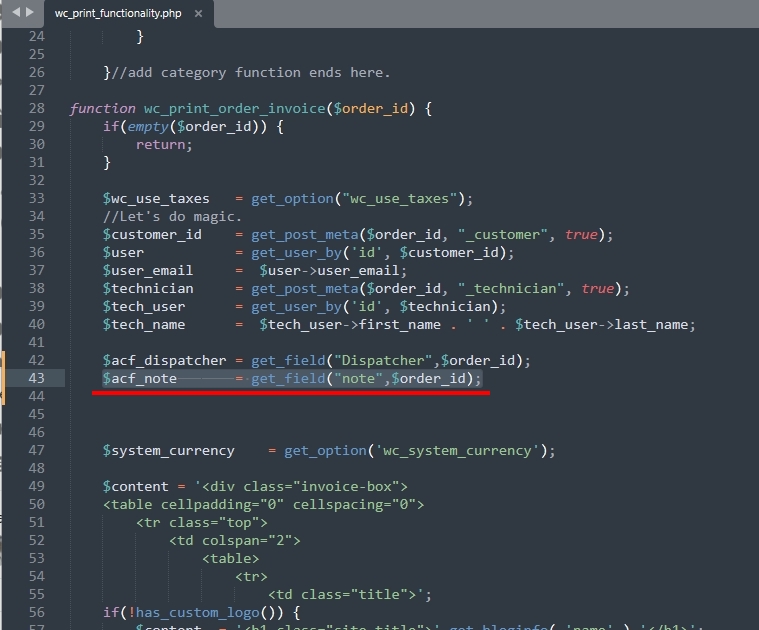
一樣是更改wc_print_functionallty.php檔案
這次抓取派單人員的程式代碼如下
$acf_dispatcher = get_field("Dispatcher",$order_id);之後再需要列印的地方插入以下代碼
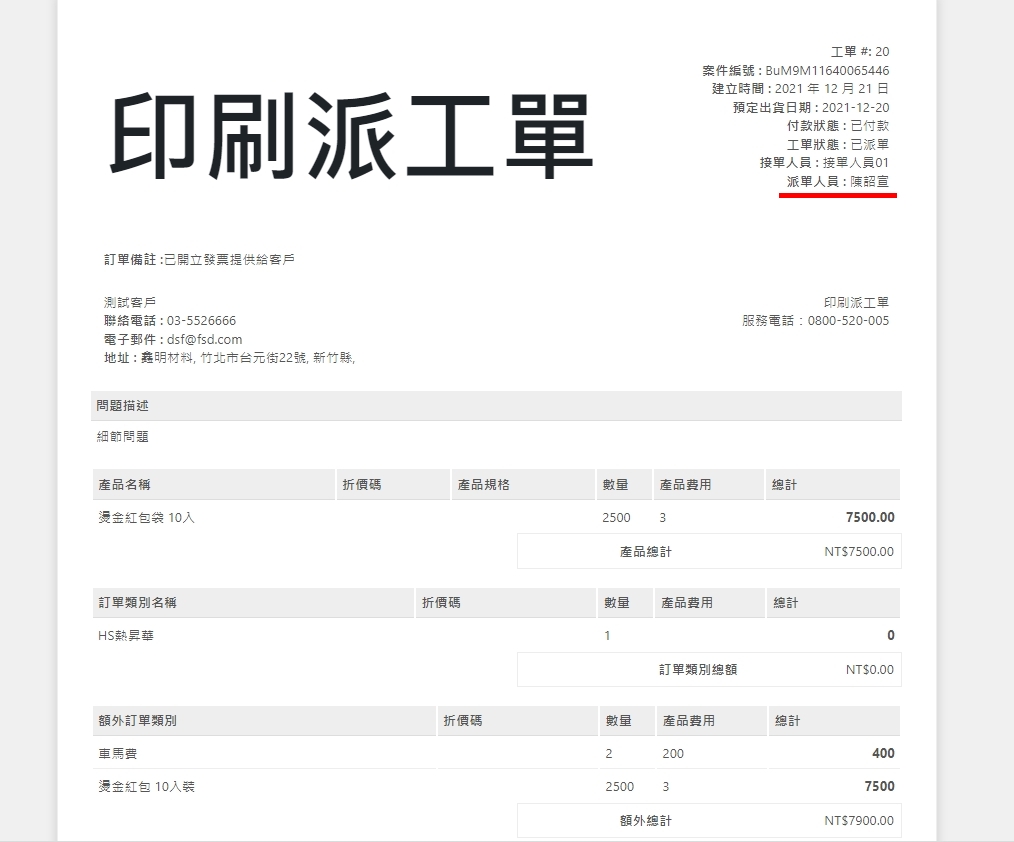
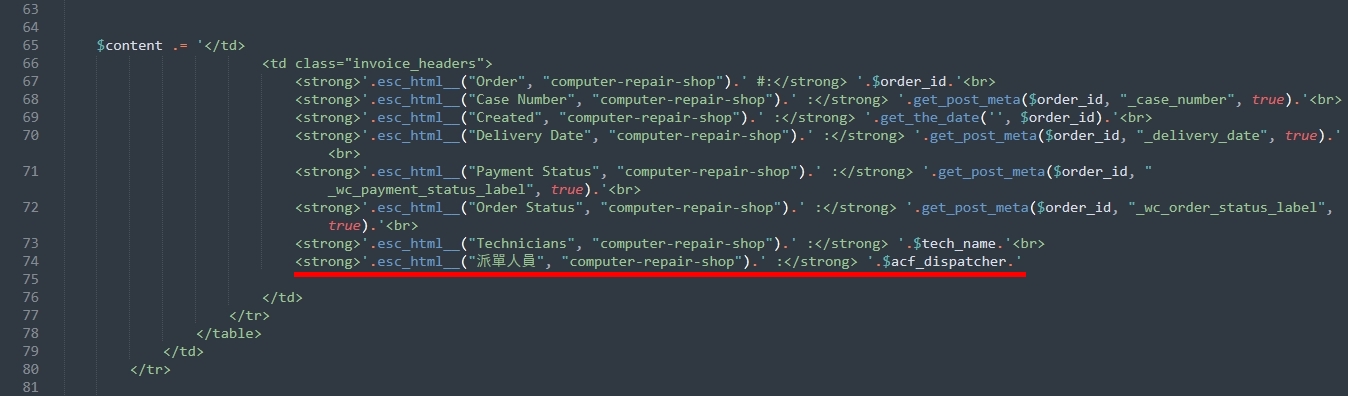
<strong>'.esc_html__("派單人員", "computer-repair-shop").' :</strong> '.$acf_dispatcher.'Dispatcher 就是自訂欄位(派單人員)的ID
$order_id 則是抓取該派工單的文章ID
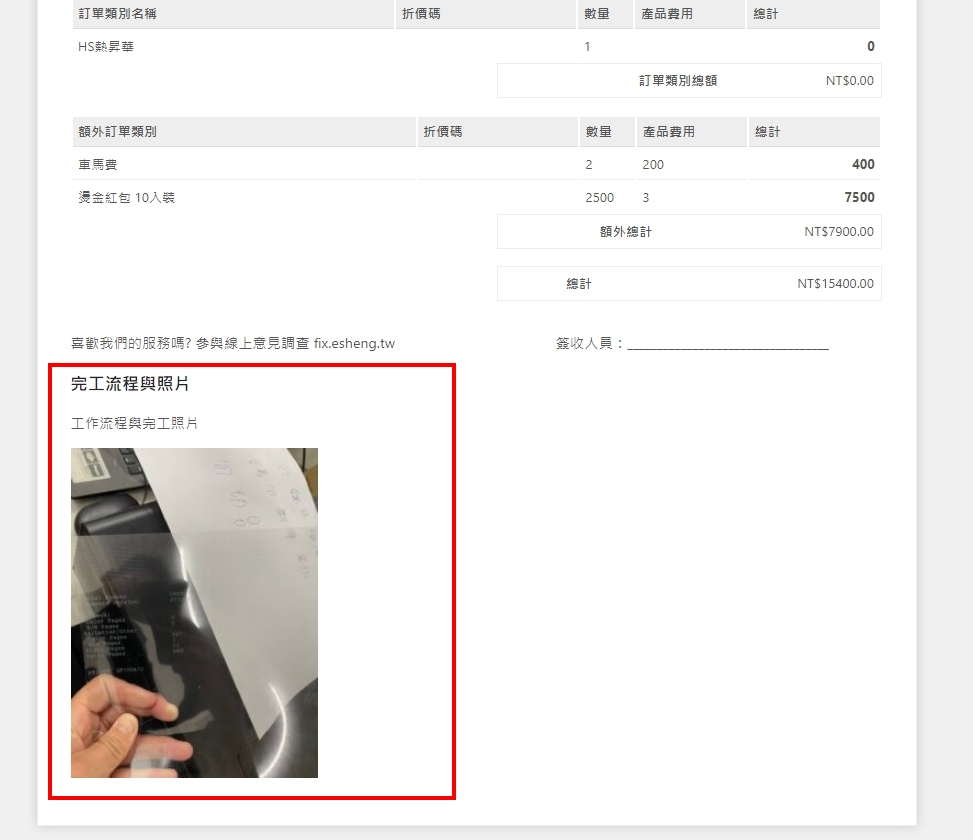
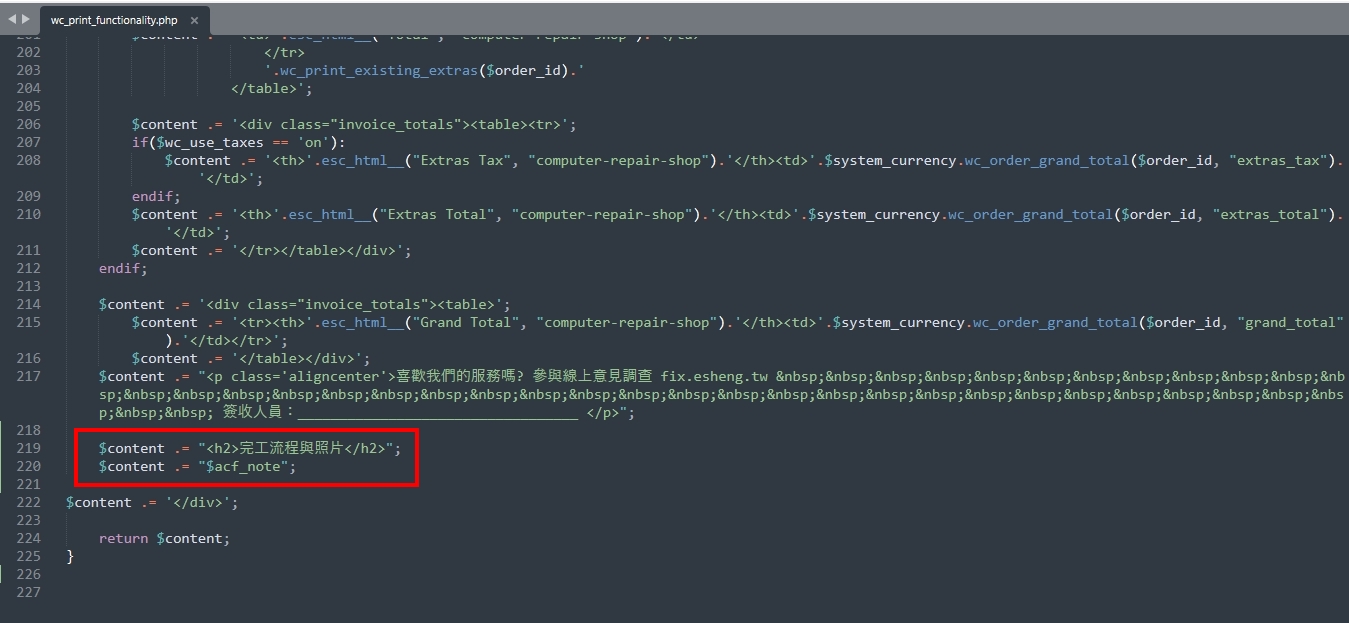
新增ACF自訂欄位 (可視化編輯器) 後台+列印
需要設定的代碼方式同上
這次要放的代碼為
$acf_note = get_field("note",$order_id);以及最下方
$content .= "<h2>完工流程與照片</h2>";
$content .= "$acf_note";
列印時無法正確顯示圖片logo
檔案位置: \wp-content\plugins\computer-repair-shop\lib\includes\reports\large_invoice.php
找到 if(!has_custom_logo()) 這一段代碼
將下方的
$content .= '<h1 class="site-title">'.get_bloginfo( 'name' ).'</h1>';修改為以下
$content .= '<img src="'.esc_url("圖片Url").'" style="width:auto; max-width:100%;height:60px;" />';就能強制改變圖片logo
右上明細 更改文字大小
檔案位置: \wp-content\plugins\computer-repair-shop\lib\includes\reports\large_invoice.php
找到 <td class=”invoice_headers”> 這一段代碼
並修改為以下
<td class="invoice_headers" style="font-size:20px;">更改font-size的數值就可以更改文字大小
如果有其他地方也要更改文字大小,效仿上面即可
找到上層代碼並插入 style=”font-size:20px;
驗證授權失敗
之前有遇到驗證失敗的問題
結果是外掛的驗證連結出狀況所以無法驗證
可以到 \wp-content\plugins\computer-repair-shop\lib\templates\activation
裡面的 activation_form.php 檔案
約在73行 $url = ‘https://www.webfulcreations.com/members/licensecheck.php’;
把網址調整為可以正常驗證的網址即可
驗證授權時間修改
可以用驗證碼到SQL資料庫搜尋
可以找到資料表”wp_options”內有一個option_name是wc_cr_license_details
後方的option_value可以調整使用的年份
目前order.colorpen.tw調整許可證到期日到2099年
所以基本上等於能夠無限使用
單字翻譯
線上報修系統 > 派工單
上方下拉選單
Payment Status (All) 修改為 服務品質 (All)
.po修改無效,從\wp-content\plugins\computer-repair-shop\lib\includes\wc_jobs.php
約1009行調整
上方下拉選單
Job Status (All) 修改為 工單狀態 (All)
.po修改無效,從\wp-content\plugins\computer-repair-shop\lib\includes\wc_jobs.php
約984行調整